Wednesday, 30 September 2009

Stampin' up Party

I went to my first ever Stampin' up Party tonight. I had a really nice time. The Party was hosted by Caroline who works at the Ashridge Farm Craft shop and also runs Carann Crafters. I ordered the tab punch (I have been after one of those for a while) and a set of tree stamps. I also picked up some good tips for future projects.

There was a 'Make and take' and we made a lolly card. We tried out some of the punches and stamps.

It was a lovely opportunity to have a chat with other crafters and to finally see Stampin' up products in the flesh. I had been looking forward to going for ages! I was expecting to feel more enthusiastic about the products but only saw a couple of sets I really wanted to order. During the demos the stamping did not seem to come out very even which put me off a bit, the treat bag above was stamped with a roller stamp and I think it looks quite patchy...could be the ink maybe...I will see how my stamps perform when they arrive!

Am off to bed now! Am hoping will have some time for a crafting session tomorrow, I felt really under the weather yesterday and had to go to bed early :-(

Jane
x

Monday, 28 September 2009

A recipe for Cupcakes...

I made this card this evening to take part in 2 blog Challenges. The Monday Challenge on the Fiskarettes website is Spots and Stripes (2 of my favourite patterns!) and I am also taking part in the first Challenge for the Cook up A Card - Recipe blog.
The September Recipe is to use:
  • 1 Flower
  • 2 Ribbons
  • 3 pieces of Chipboard


I used some of the stash I bought yesterday at Alexandra Palace for the card.
I cut a piece of orange card with my Fiskars paper trimmer and rounded one edge with corner shaper scissors. I then cut a rectangle of striped card which I matted on to blue to give a slim border.
I cut some circles with the Circle cutter and layered them up. The Cupcake stamp I got from Sugar and Spice crafts was stamped onto striped Paper Crate paper and spotty My Mind's eye paper and was paper pieced.
I added some blue ribbon to the striped rectangle and matted onto the orange card.
The topper was assembled with foam pads and I added a flower to the top of the cupcake.
I used Making memories chipboard letters to spell out 'cup' to the left of the card, I added some folded ribbon tab details to the 'U', set an eyelet with the Eyelet setter and tied ribbon through it.
I finally stamped the greeting and finished off with some stick on gems.
I like the summery feel of this card and it fits in well with the weather we have been having lately, let's hope it lasts!
Jane
x

Magnolia Thank you card

This is another Thank you card for a Friend. The Magnolia image was received in an image swap.

I cut all the shapes with Nestabilities. The papers are from the DCWV Baby Girl stack and I coloured the image with Promarkers. The green flower was also coloured with a Promarker and the sentiment is Elzybells.
This is the first time I have used a Magnolia image and I think she is really cute, I have recently bought a Magnolia stamp of my own which I hope to try out soon.
Jane
x

Congratulations Card

I made this little card to include with the Blog Candy which I sent out this week. I used the lovely Elzybells Scrap and Stamp image and an Elzybells sentiment stamp. The layout has been kept quite simple.

The image was coloured with Promarkers and the backing paper is K+Co. The ribbon is an old belt I kept from a shirt which was thrown away ages ago and I finished of the card with some stick on gems.
Jane
x

Sunday, 27 September 2009

Look what I got today!!!

I went to Alexandra Palace today with my Friends and had a whale of a time!! I spent far too much money, saw lots of interesting and clever people and got loads of goodies to play with!

I met Linda from Oak House studio whose blog I follow and bought some of her stamps, a tree and some oak leaves, a My Favourite things stamp, a cupcake stamp set, a new ATC back, a Lili of the valley stamp of a little girl on a swing with a puppy that is soooo cute!
I got 20 sheets of 'Crate paper' 12x12 scrapbooking paper for £5.00 in some packs from Willow tree crafts, a Basic Grey 6x6 stack for £2.25 and some lovely chipboard letters...
I treated myself to 2 new sets of Nestabilities and a Quickcutz photo corners die...
I got lots of pretty embellishments, ribbon, pins, brads, lots of Prima flowers, gems. I also stocked up on the basics, envelopes, adhesives, card bags etc... I had a great day and can't wait to start playing with all my new stash. I also swapped ATCs with some other crafters and watched a great demo by Sheena Douglass, she is so clever and also very entertaining!
Here are my Friends Petra and Helene with bags of stash as we were leaving.
Can't wait for the next outing now! I am hoping to go up to Birmingham in November.
Hope you all had a lovely weekend!

Jane
x

Whiff of Joy Thank you card

I made this Thank you card to give to one of my Friends to Thank her for my lovely Birthday presents last week. The image is Whiff of Joy and was received in an image swap with a blog Friend. The backing paper was won in a blog candy recently.


I cut the image out with a labeks Nestabilities and layered onto a brown scalloped square, this was then layered onto a lime green square.
The image was coloured with Letraset promarkers and was layered onto the matted and layered backing paper. I chalked the paper to give it a distressed feel.
I layered some paper flower and punched an oval to stamp the Elzybells sentiment onto.
The lace was coloured with Promarkers and was stuck to the backing paper before adding the stamped topper.
I scheduled this post today as I will be at Ally Pally all day but will hopefully be back later with news about my day!
Jane
x

Saturday, 26 September 2009

ATCs for Ally Pally

Last time I went to Ally Pally in April they kept announcing ATC swaps over the PA system and I wasn't able to take part as I didn't have any ATCs with me :-( I am going to Ally Pally tomorrow so I thought I would make a batch to take with me this time.

I used the Elzybells Scrap and Stamp set to make these ATCs. I chose some nice backing papers and coloured the images to coordinate with them. I embellished the image with a gem and cut it with Nestabilities and mounted it onto a black scalloped circle. I then stamped the 'Stamping is my Therapy' sentiment directly onto the backing paper and put the whole thing together. I really love this little stamp and hope that whoever receives my ATCs will like it as well.
Only one more sleep until Ally Pally!!! Wooohoo!!!
Jane
x

Friday, 25 September 2009

BLOG CANDY WINNER!!!!!!!!!!!!!!!!!!!!!

The blog candy winner has been picked! Ryan wrote out all the entrants names and Jack's innocent hand picked a winner from our trusty Sainsbury's red label tea caddy. The winner is........


Hazel (Didos)

Congratulations! Please email me with your address and I will send the blog candy out to you asap.
Thanks to all of you who took part and keep your eyes peeled for more candy!!!

Jane
x


Birthday and 100 post Celebration Blog Candy!

***********CANDY IS NOW CLOSED!!!!!!!!!!!!!!!************

To celebrate reaching my 100th post on my Blog and my Birthday at the end of the Month I am offering the shamelessly pink candy below.

The package includes:
  • a Magenta Promarker
  • a bundle of pink and purple ribbons
  • a sheet of Doodleug icon stickers
  • 2 Little Claire designs tag card blanks
  • a pack of lilac Kaiser Rhinestones
  • A Craftwork cards Cupcake chipboard album and binding ring.
The blog candy will stay open until the 25th of September and (I hope!) this post will stay at the top of my blog until then. I will randomly draw a winner on the 25th.

To be in with a chance of winning, please comment on this post, tell me what you would love to receive as a present for your next Birthday. If you would like to mention my Candy on your own blog, I would be very grateful!
Good luck!
Jane
x

You are a star!

For my second Fiskarettes Design Team project, I decided to challenge myself to make a card without using any stamping.


83Dzz535c328n0h2SpcR.JPG


For this project you will need a square card base, kraft card, My minds eye papers, Basic Grey and Making memories letter stickers, a K+Co chipboard letter and various Fiskars tools.

1. Cut a square of brown kraft card 1/2 a cm smaller than the card base using the Fiskars paper trimmer, then cut a square of green card 1/2 a cm smaller than the Kraft card and finish off with a square of patterned backing paper another 1/2 cm smaller. Matt and layer all pieces on to the front of the card. The graduated ruler on the paper trimmer makes matting and layering so easy and precise and very quick too!

2. Cut circles in decreasing sizes from various materials using the shape cutter and circle templates. I used the template to mark the circle on the orange lacy fabric and cut with my trusty Fiskars scissors. When the circles are all cut layer them up and stick together. The larger green circle was stuck flat on the card but the smaller one was raised on foam pads to give the card some dimension.

3. Cut a star from Patterned paper with the Fiskars squeeze punch and stick to the smaller circle. Embellish with a button. The punch is easy to use even without applying too much pressure and gives a really neat finish to the cut shape.

4. Stick backing paper to a chipboard letter ’S'. I used quick drying PVA and stuck something heavy on the letter while it was drying to make sure I got a nice smooth finish. When the glue is dry, cut around the shape to trim off the excess paper with the finger tip craft knife. As this is really small and you have such great control of the blade it is ideal to cut around awkward shapes. To give a neat finish, file the edges of the shape with a nail file.

5. Stick the chipboard letter on the largest circle and add die cut letters and letter stickers to complete the sentiment.

696t353NNZ28hqH0y2LT.jpg

I like this card as it shows how you can make an effective card layout using a few papers and tools. Cutting the shapes with tools make such a difference to how neat the card looks and makes it look much more professional!

Jane
x

Thursday, 24 September 2009

A perfect Birthday!

It was my Birthday today and Thanks to my Wonderful Family and Friends, I have had a perfect day!
I was truly spoilt by my Husband this morning with a tin full of Promarkers. I already had about 50 and he bought me the colours I was missing from the original 92 colours! I am so excited to have the full collection and can't wait to get colouring and experimenting with shading etc...

I my got lots of lovely pressies from my Mum and Dad and money to spend too and lots more pocket money from my inlaws and Nannies to add to my Ally Pally shopping fund :-)

I went into work this morning as usual and was greeted by a banner at our Office door which really made me chuckle! Petra and I made this banner for a Friend's birthday earlier this year and my Friends decorated the office door as well.
I was further spoilt with a gorgeous homemade cake to share with everyone at work, it was so yummy! Petra's cakes are really the best I have ever tasted! I also received handmade cards too which were so pretty.
These are my lovely pressies I received from my Friends Petra and Helene, lots of lovely Craft stash to play with, papers, card blanks, ribbons, embellishments, enough to keep me out of mischief for ages!

The pink box is a milk carton that Petra gave me with some gorgeous buttery crumbly biscuits inside. I also received a very pretty book with lots of ideas and tips for homemade projects which I am going to snuggle up in bed with in a wee while.
We went out for lunch today too and were able to sit out in the sun, we also popped in to the Craft Shop at Ashridge farm for a warm up shop in preparation for our trip to Ally Pally :-) I restrained myself and just bought some lace, stick on gems and some American crafts paper, I spent less than £5.00 which is unheard of for me!

I thought I would add a little photo of Charlie taken today, he is growing so fast! We will be able to take him for walks next Tuesday as he will be fully protected from his jabs by then. He is still very cute and naughty and pesters poor Patch the cat all the time, she has no patience with him and he thinks she is just the most amazing thing he has ever seen! I hope one day they will be Friends...

Am off to bed now, Thank you to everyone who has made my day really special! I feel so lucky to be surrounded by such a lovely kind and caring Family and wonderful Friends.

Jane
x

Wednesday, 23 September 2009

September ATC swappers ATCs: My favourite stamp

I made some ATCs for Paul's ATCS swappers monthly swap. The theme of the swap this month is 'My favourite stamp'. It is really hard to pick a favourite but I do really love this little Snoozing ted stamp from Elzybells and I have used him on so many cards for men and ladies, it is very versatile and so cute!


This time I paper pieced the sofa with K+Co papers and coloured the Ted in with promarkers. The letter stickers are Making Memories.

If you are interested in taking part in Paul's swap, you can contact him via his blog. I also run a monthly swap. Take a look here for more details and some photos of past swaps.
Jane
x

Tuesday, 22 September 2009

Stampin' Chic Challenge card

This is a card I made to take part in Clare Curd's Stampin' Chic challenge. The photo does not really do this card justice as the colours seem to have gone a bit funny...in real life the green of the 'Mum' letters does match the other green card used!


The challenge this week was to follow a sketch. I love the Clare Curd 'Big One' paper pad as you do not need to put much else with it to make stunning card. I cut out and layered up some flowers and added them to a Nestabilities circle, the flower stalks are cut from a Cuttlebug shape. The letters are Basic Grey and the scallop strip was punched with a Fiskars border punch.
I love all the polkadot papers in this paper pad as spots and stripes are my favourites :-)
Hope you are having a good week.
Jane
x

Carol's sketch fun challenge card

I made this card earlier this evening to take part in Carol's sketch challenge but I think I missed the deadline :-( I had trouble with my camera running out of battery and then uploading piccies so I think I was a bit late!
It doesn't really matter though as I had lots of fun making the card.


Carol had provided a lovely sketch for us to follow again and she has a lovely prize up for grabs. I will have to make sure I am a bit more organised next time!
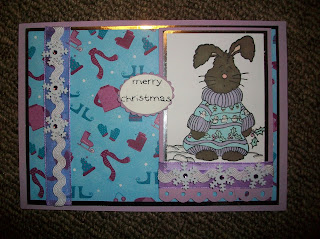
Oooh! Nearly forgot, image is Messy Rabbit coloured with Promarkers and glossy accents and the paper is DCWV Christmas stack, ribbon is from my stash and the snowflakes are confetti embellished with a gem. Sentiment is Elzybells.
Jane
x


Monday, 21 September 2009

New Fiskarettes Design Team project sneak peek

My latest Design Team project will go live on the Fiskarettes blog on Wednesday. I made the card last night so I thought I would give you a sneak peek.

I challenged myself to not use any Rubber Stamping on this one, quite hard for someone as addicted to rubber stamps as I am! I decided to gratify my other addiction....patterned papers, and in particular polka dots. I love polka dots and stripes, if I had to choose 2 patterns and forsake all others, they would be my choice :-)
Am hoping this week will fly by as I am off to Alexandra Palace on Sunday for a LOT of retail therapy! Are any of you going? I am looking forward to seeing Linda from Oak House Studio who will be there as her stamps are just fab and some of my favourite local shops will be there too with lots of Show specials!
Can't wait!

Jane
x

PS. Remember there is still time to enter my Birthday blog candy which I will draw the day after my Birthday on the 25th!

Friday, 18 September 2009

My First Whiff of Joy card

I received some gorgeous Whiff of Joy images in a stamped images swap (Thank you Claire !) and this is my favourite. I think the girl looks so cosy and the image is really peaceful.


I am going to see my Mum this weekend, she has been quite ill and had a stay in hospital this week. It was bad timing as my Mum and Dad moved house yesterday! I am going to see them for the Weekend so I wanted to take a card for my Mum. She still has to rest so that she can get completely better so I thought the Take it easy sentiment from Elzybells would fit well with this image.
I coloured the image with Promarkers and layered it onto K+Co papers and corrugated Kraft card. The scalloped border was cut with a Fiskars punch. The ribbon was a bargain buy from Hobbycraft and the flowers are Prima mixed with a Sizzix flower diecut from lacy ribbon.
I really liked combining the orange blue and brown on this card and I can't wait to colour the rest of my stamped images and make them in to cards!
Jane
x

Blue and Silver Messy Rabbit ATC

I made these ATCs quite a few days ago for Becky's Monthly ATC Swap. I have been practising my colouring with Promarkers and tried to get a shaded effect on Messy Rabbit.

I really love this little rabbit and I think he will be making an appearance on quite a few of my Christmas cards. I used glitter glue for the snow.
We have had quite a hectic week with both my Mum and Darren's Mum being ill and giving us a bit of a fright. They are on the mend now and I am off to spend the weekend with my Mum and Dad tomorrow so no crafting for me but lots of unpacking as they will be settling for good in their house in Swindon.
I hope you all have a lovely Weekend!

Jane
x

Tuesday, 15 September 2009

A Special Couple Card - First Fiskarettes DT project

This is my First Design Team project for the Fiskarettes blog. I bought this paper recently and thought it would be ideal for a Wedding Card.

1. First cut a large card blank using my Fiskars paper trimmer. I made a large card which was 20cm square so cut one piece of card 20cm X 20cm and a larger piece, 23cm X 20cm. I scored and folded the larger piece 3cm in from the edge on the shorter edge of the card and stuck both pieces together covering the join with a piece of ribbon.

2. I layered pink, cream pearlescent card and the backing paper onto the front of the card. I cut the first piece the same size as the card front and trimmed the 2 other pieces so they were slightly smaller with my paper trimmer.

3. To make the topper, I stuck my Elzybells Wedding couple stamp onto my Easy stamp press and stamped the image onto white card. I use unmounted stamps for most of my crafting so the stamp press is ideal for me to get a perfect stamped image every time. When I have finished I just whip the stamp off and am ready to go again. I coloured the image with Promarkers and matted it onto some pink card to frame it nicely.

4. I took inspiration from the lace pattern on the Backing paper to make a punched border panel to set the stamped panel into. I used the 2-in-1 Corner & Border Punch - Vines to decorate the edge of a panel I had trimmed to size with my paper trimmer. The paper trimmer is great as it measured in inches and cm.

5. The vines border punch looked very complicated but after reading the instructions I realised it would be very easy to create a beautiful border. You simply set the tool in the corner of the paper and punch, there are then notches on the punch to make sure you get the paper in the right place for the rest of the border so you can’t go wrong.
The design of the border has perfect little photo corner slits so I popped my stamped panel into them.

6. Before sticking down my backing paper, I added a length of ribbon to the front of the card, tucking the raw edges under one of the layers. I secured it with a tiny piece of double sided tape on the front of the card to stop it from moving around. I then stuck the stamped and punched panel onto the front of the card with foam pads and tied a bow with more ribbon to the side of the topper.

7. I stamped my Sentiments using the Easy Stamp press on to some white card, cut them out and matted on to cream card before sticking them to the front of the card with foam pads.

7hd2bN52LbS931qM224C.jpg

8. I finished off the card with a paper flower and a pearl heart.

28w529ibt312QV24qRiy.jpg

I love the border punch so much and can’t wait to use it again on another project!

Why not pop on over to Fiskarettes and sign up to join in the fun, there are Challenges, Competitions and loads of inspiration. You can create your own profile and upload your projects to share with the rest of the Fiskarettes!

Jane
x

Monday, 14 September 2009

First Fiskarette's DT Project Sneak Peak!

My first Design Team Project will be featured on the Fiskarettes blog tomorrow. I had lots of fun playing with the Fiskars tools.

Here is a little sneak peek....
Jane
x

Sunday, 13 September 2009

My First Funky Hand Wordbook

I received a card commission last week from a Friend for a card for her to give to one of their Friends.
I decided to try my Funky Hand Wordbook cd. I have used it to print papers before to take part in challenges and to use on cards but had never got around to making a Wordbook. I was pleasantly surprised by how easy it was!

I decided to use the 'Anyone for coffee' papers. They are really lovely colours and I like the letter font used.
I printed out the letters for 'Mike' then fed them back through the printer to print the back with the circles pattern. I used medium weigh textured paper. I cut out the letters, selected the length I wanted the book to be and trimmed to size. I scored each page and the end, stuck them together with double sided tape and set in some eyelets with my Cropodile.
I decided to decorate each page. I printed a sentiment with the PC, cut into strips and inked the edges and stuck to the page.
I stamped the Elzybells snoozing Ted and paper pieced him with offcuts of the printed paper. I then cut him out with Nestabilities and layered onto another circle cut with Nesties.

For the last page, I matted and layered a page printed with the sentiment. The person the card is for likes Music so I used a Papermania Christmas Music stamp to add Music sheet to the edges of the card.
So quick and easy! And I love it! I almost don't want to give it away! I will definitely be making more of these. I made an envelope for the card to go in from a 12x12 Scrapbook page.

I saw today that Anice has some new Xmas downloads available to I may have to add these to my ever growing Birthday wishlist...roll on the 24th!!! Am counting the days until my Birthday as 3 days later I am off to Allie Pallie with a Friend, I went earlier this year and it was just fabulous! Can't wait!
Hope you had a good weekend :-)
Jane
x

Saturday, 12 September 2009

Stamping is my Therapy!

I sent a collection of stamped images to my very talented blog and ATC swap Friend Claire this week and wanted to make something pretty to put them in.


I made a little card using on of the Elzybells new release stamp sets. This set is perfect for an addicted Crafter as all the stamps in the set are to do with Cardmaking or Scrapbooking. I used the girl stamping for this card some Basic Grey Cardstock and Kraft card and my Nestabilities and Promarkers for the image.
The Mulberry flowers are from Papermania finished with stick on Gems.

To make the folder to put the images in, I folded an A4 sheet of pearlescent card and added ribbon. I then covered the front and back panels with more Kraft card and Basic Grey cardstock. I stamped and coloured the same image and added a sentiment in a Nestabilities scallop. I decorated with more flowers and tied the bow.

The finished gift looked really effective. I will definitely be making more of these to give away as they are so pretty and a great way to store stamped images waiting to be coloured.
I have another afternoon of stamping lined up today, we are going to watch Jack in his first football Match today then off to town to get some ribbons and buttons from the market!
Jane
x

Thursday, 10 September 2009

Moving along with the times sketch Challenge

Here is my card for the Moving Along with the times sketch Challenge. The image is Messy Rabbit and I coloured it with promarkers.


There was lovely sketch by Heidi to follow this week and the theme was Christmas. I dug out my Nestabilities to cut the squares and embossed some white card with a Cuttlebug Snowflake folder. I got this in the post today so I was dying to use it! I coloured one of my Prima flowers with my silver pen and layered it up with a blue flower and a piece of Snowflake Confetti finished off with a sticky gem. The ribbon has been lurking in my stash for ages. It is a really nice shade of blue. The prize for this week is a Guest Design team spot so why not pop on over and play along for a chance to work with the talented Design Team!
Jane x

Black and White Card

I made this card today for the Monday Challenge on the Fiskarettes blog which is black and white.
This is the first card I have made and posted since becoming part of the Design team. I love monochrome cards so I was really excited when I saw the latest Challenge.
To make the card, I covered the base in 2 different spotty papers which I cut to size with my Fiskars paper trimmer. I covered the join with a scalloped paper strip cut with the Fiskars threading water border punch, I then layered a strip of stripy ribbon over the paper strip.

To make the flower panel. I used my stamp press to stamp flowers and leaves onto patterned paper and then cut them out. I sewed stems with black thread onto a panel of white card and stuck on the flowers and leaves. The stamp press is so easy to use and makes sure the stamped image is perfect every time.
The panel was then set into a black panel. I used my pearls squeeze punch to cut into the corners of the black panel and embellished with stick on gems. The panel was mounted on to the card and I added a stamped sentiment.
Jane
x

Wednesday, 9 September 2009

Pink and Girly Jolly Nation gorgeousness!

After the muted colours cards I made yesterday, I fancied making something really pink and girly.
I was a bit short on time so I dug out my Jolly Nation Die Cut decoupage packs and came across the sheet with the 2 little girls.

I have lots of blank aperture cards left over from my cross stitching days and am always looking for ways to use them. The little girl with the handbag fitted perfectly into the aperture and the coordinating paper from the pack was perfect to cover the front of the card. I cut around the aperture with a craft knife and tidied the edges with a pretty white peeloff. I used some flowers from my stash to add an extra touch of girly pink and a sentiment stamped with Elzybells stamps. I decorated the flower centres with pink sparkly gems.
As a present to go with the card, I embellished this lovely sparkly notebook I picked up ages ago for about 50p. I die cut some oval shapes from silver card and the patterned paper and layered the decoupage girl on top. I simply finished off the notebook with some more bling. Can you ever have too much bling? :-)
These items will make a lovely gift for a little girl and were so quick to make as the Jolly Nation decoupage is all die cut so no messing around with fiddly little scissors! I think I am going to find them hard to give away!
Jane
x

Exciting news! New Design Team position


I am very happy to announce that I have been chosen to be a part of the Fiskarettes design team for the next 3 months. The new Design Team was announced on the Fiskarettes website today and it was very exciting to see my article posted on the site today. I can't wait to get started creating Projects to share with the other Fiskarettes. Please check out the website for loads of inspiration, weekly challenges plus the opportunity to win lots of lovely Fiskars goodies in the regular Competitions!
Hope to see you there soon!
Jane
x

Tuesday, 8 September 2009

Feel Better Soon Card

I made this card tonight for a Friend of mine who is poorly. It was the perfect opportunity to use my new Basic Grey papers, they were a joy to work with and the pattern is just gorgeous!

The stamped image is by Elzybells, I coloured it with Promarkers and paper pieced the duvet with the Basic Grey paper. I used Kraft card to matt and layer, I love Kraft card at the moment and it looks great with the backing paper. I cut a Nestabilities oval to add the sentiment. The lace was a charity shop find and I cut the flower with a Sizzix shape from some webbing I bought in John Lewis then layered it with a paper flower and button. I added a bit of bling under the lace.
Now my desk is a total mess again but it was worth it! I wonder if they are actually any tidy crafters...I have not met one yet!
Jane
x

Monday, 7 September 2009

A pink and girly New House card

This card was a commission from one of my friends at work. She is one of my best customers and has always encouraged me in my cardmaking. It was such a nice feeling that someone loved my cards and wanted me to make special ones for them to give to their Family and Friends.

This card is for Jade who is moving into a new shared House at University in York. She loves pink and girly things so I was able to indulge in lots of pink and bling. The stamp I used is by One Four Zero and I bought the paper in Cornwall on our holiday this year. I cannot remember where I got the little key from but I found it recently in my stash and thought it would be ideal for this card.
I hope Pauline and Jade like it!
Jane
x

Sunday, 6 September 2009

Get Funky Challenge - Footie scores book

I made this little book earlier for the Get Funky Challenge but couldn't post it as it is a surprise gift to for my Son Jack. He is has been accepted into a local football team and has his 1st proper training session next week on Tuesday. Jack and his older brother love writing lists and keeping records of all Football scores and results, both in real life and from their Computer Games.
To make the book, I covered some chipboard which I had trimmed to the right size with a Funky Hand paper from the Funky Word books cd. The paper is actually a Christmas paper but Jack loves red and green so I thought this would be perfect. I put the book together with my Bind it all and set to work making a topper. I stamped footballs on to white card and cut it out into a circle with I matted and layered. The teddy stamp is from Elzybells. I stamped him and coloured him with Promarkers, then I cut him out and layered him up with foam pads on to the circle.
I cut out letters from the alphabet sheet which is also on the Funky Hand cd using a Nestabilites circle as a template. I stuck them to the book with foam pads and added Glossy accents to the letters. Footie is spelled out with K+co letters (I find these really useful!).
To finish the book off, I set an eyelet into the top right had corner of the book and threaded through a football phone charm (I got this from a supermarket ages ago for 20p! I knew it would come in useful one day!)
Jane
x