Showing posts with label Tim Holtz. Show all posts

Monday, 10 September 2018

A little play with Distress inks and some Clearly Besotted stamps

Hello Everyone!
I hope you had a lovely weekend. Mine was very busy but I did manage to fit in a little bit of time in my Craft room to have a play with my new Wishful Thinking Clearly Besotted stamps to make the card below.


I used Distress inks to create a background on a square or card I had masked off with washi tape.


I then stamped the images with Archival ink and stamped a sentiment on vellum which I wapped around the image before adding it to a layer of yellow card before adding it to my card base.
I then finished with stick on gems.
I hope you have a lovely Monday!
Jane
x

Saturday, 2 November 2013

'White on White' for the Ali Craft Challenge

Hello Everyone! I hope you are all well and are having a good Weekend so far. It's time for a brand new Challenge on the Ali-Craft blog today and our theme this month is 'White'. This was a really hard theme for me as I love using lots of colour on my cards. I did, in the end, manage to make the most difficult card to photograph ever!


I used Tim Holtz stamps which I heat embossed with white glitter powder for my image panel and layered this onto white card which I had embossed with a small dots folder. I wrapped the dots panel with white glittery ribbon before adding it to the card and added a large bow topped with a white button and finished with lots of stick on pearls. I hope you will be able to join us for this Challenge for the chance to win a voucher to spend at Ali-Craft. Have a lovely Saturday!
Jane
x

Sunday, 28 April 2013

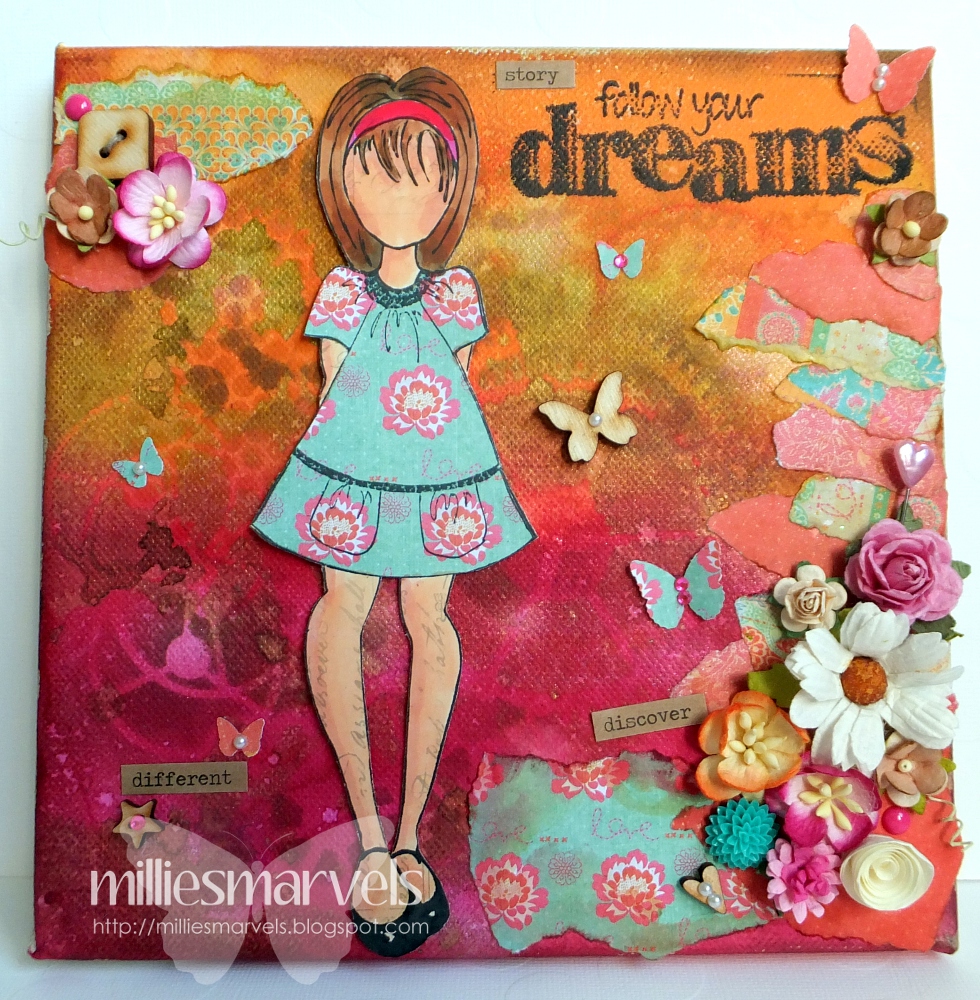
A Prima Mixed Media canvas


Hello Everyone! It's my day for sharing a project on the My Mum's Craft Shop blog and I have something a little bit different for this week. I have finally got around to using my Prima Mixed Media doll stamp and made a canvas.
The canvas is approximately 8x8 and the doll fits on it perfectly. I used radiant rain paints, cosmic shimmer sprays and distress inks with some masks to make the background which I then dried with my heat gun.


I used one of the new Artistic Stamper stamp sets for my sentiment which I stamped in the top right corner. I ripped pieces of Prima paper from the  Sunny Days pad and stuck them on the canvas and distressed them with Distress stains.


When they were in place and added lots of flowers on top including a new resin cabouchon which matched the papers perfectly and some wooden buttons and punched and wooden butterflies.


I stamped the doll onto one of the tags from the Prima Tag Pad and then coloured her in with my Promarkers. The dress was paper pieced using a paper from the Sunny Days Pad. I then cut her out and added her to the canvas using my glue gun. As a finishing touch, I dotted around a few words from the Tim Holtz chit chat stickers pad and some enamel dots and gems and pearls. I have entered my Canvas into the latest Craft Stamper Challenge.
I hope you have a lovely Sunday!
Jane
x

Tuesday, 5 February 2013

Sugar Nellie DT - Alicia

Hello Everyone! I had an urge to play along with a Sketch Challenge on Saturday so picked my favourite which is Sketch Saturday! I used the lovely digi image Alicia from Sugar Nellie  and coloured her in sepia tones to match my Simple Stories papers.


I loved this week's sketch! I added some stitching and some flowers and a Lili of the Valley sentiment which I stamped on a tag cut with a Tim Holtz die.


Here is a close up for of the lovely Alicia. I added some little stick on gems to her hair and finished the card off with some stick on pearls. I hope you have a lovely Tuesday!
Jane
x

Friday, 1 February 2013

My Mum's Craft Shop Challenges - Valentine's/Love

Hello Everyone! Just a quick post from me today to let you know our new Challenge has started on the My Mum's Craft Shop blog.

Our new challenge is....
VALENTINES / LOVE
and we will be giving away a £20 voucher to the lucky winner!


I have made a little card  using Echo Park papers,a Dienamics die,  Paper Smooches stamps 
I hope you will be able to join us for this month's Challenge. Make sure you check out the blog for lots of inspiration from the DT!
Jane
x
 

Sunday, 18 November 2012

The Ribbon Girl Colour Challenge - Lavender Shades

Hello again! As promised I am back with my card for this month's Ribbon Girl Colour Challenge. We have a great set of colours for you to work with this month and they inspired me to make something other than a card for a change. I recently bought some 'distressed' curtain finials in a Charity sale and I thought they would be perfect to use as a base for a mannequin. To make the mannequin, I started by glueing some kebab sticks into the curtain finial and packed them in tight with some crumpled newspaper and glue. I cut the sticks to size and then wrapped them with button twine. I used a Tim Holtz die to cut some felt for the body of the mannequin and sewed around the edges leaving the bottom open, I stuffed the felt shape then stuck it on top of the covered sticks and sewed up the bottom edge.


I then set about decorating with lots of lovely goodies from the Ribbon Girl. I used lilac velvet ribbon lace at the bottom of the body and some velvet ribbon around the waist and I hid the join with a resin flower.


I decorated the base with lots of gorgeous flowers including the Kordt and Godt Beaded Ivory Roses which are just stunning and I added lots of lilac paper flowers after I had wrapped the base with lilac lace . You can just about see that I used a Kordt and Godt beaded white swirl branch to fill the gap between the base and the covered kebab sticks.


As a finishing touch I added a purple hat pin to the top of the mannequin. I am so pleased with the way this turned out, it took me a while to make but was really worth it and the finished piece now has pride of place on my windowsill above my craft desk. I hope you will be able to join us for this month's Challenge. We have a fabulous inspirational photo for you and my teamies have made some wonderful creations as usual.


We also have some fabulous prizes! A Lilac Mini Makes Kit from The Ribbon Girl


and a £10 voucher from Lili of the Valley


Enjoy the rest of your Sunday! I am off to London very soon to the Apollo to see Twelfth NIght! I can't wait!
Jane
x

Thursday, 7 June 2012

My Mum's Craft Shop DT - Inky fun with Creative Expressions stamps


Good Morning Everyone! It's my day for sharing a project on the My Mum's Craft Shop blog today and I am showing an altered frame I made using some of the gorgeous new Creative Expressions stamps available from My Mum's Craft Shop. The stamp set I have used is called Steampunk Flowers and is available here. I started with a light coloured wood box frame and removed the glass and took it all apart before staining it with Vintage Photo Distress ink. I kept going until I had the depth of colour I wanted sanding it down in between coats to achieve a distressed look. When I had finished staining I stamped the flower with cogs over the frame using Archival ink.


I created the picture inside the frame by blending Vintage photo distress ink onto white card and stamping around the edges with Vintage photo and Tumbled Glass inks. I stamped the sentiment with Archival ink and then put the frame back together before adding the flowers. I made these by stamping onto grunge paper and colouring them with distress inks and heating them with my heat gun to shape the petals. I added a Tim Holtz ticket on a pin holder and some Steampunk charms from my stash, some paper flowers and some Butterflies and little stick on pearls to finish.
I hope you have a lovely Thursday!
Jane
x

Sunday, 26 February 2012

Farnborough fun and playing with Distress inks

Hi Everyone! I hope you are having a good Weekend, mine has been fab so far! I spent yesterday at the Make it show in Farnborough and did 2 stints doing demos on the Ali Craft stand showing the lovely Crafters how to use these brushes for blending and stencilling with Distress ink. I had never used the before yesterday and they are so easy to use for blending the inks and creating backgrounds! I had so much fun chatting to all the lovely Ladies who came to see what I was doing and met up with some of my Friends for lunch and coffee. I will be back on the Ali-Craft stand today at 10.30am and 2pm not sure yet what I will be demoing as the brushes sold out yesterday!


I made the card I am sharing today a few weeks ago and realised last night I hadn't put it on my blog yet. I used Distress stains and inks to create the background and then stamped with Archival ink and   Distress inks to create the topper with Tim Holtz stamps.


The cogs were cut with Spellbinders Sprockets dies and the backing paper is by Graphic 45 and I added some metal bits and pieces which I bought from Ali-Craft at the Sandown Show.
I hope you have a lovely Sunday!
Jane
x

Tuesday, 31 January 2012

Ali-Craft Workshops at Sandown - part 1

Good Morning Everyone! I mentioned last week that I spent the Saturday before last at the Craft Show in Sandown getting inky and messy and having lots of fun taking part in the Workshops run by Ali-Craft.
I finally got around to taking photos of what I made. I took part in 4 Workshops and here is what I made at two of them.
First up is a card made using Distress stains, inks, masking and Tim Holtz stamps. This was such fun to make. It was my first time playing with the Distress stains and I really enjoyed using them! I have been playing a bit more with this technique at home and I have another card to share with you which I made this weekend.


Next up is a tag book, the spine is concertina folded and it took me a while to get my head around this one but I love the finished book and it can be adapted to be made in any size.


The inside tags can be decorated. The sample Ali showed us was full of gorgeous Artwork!


Ali-Craft will be running workshops at the Farnborough Make it show and I would thoroughly recommend you book a place if you can. I had lots of fun trying new styles and I have to admit I am a little bit hooked on Steampunk now. I am going to be helping out doing a bit of demoing on the Ali-Craft stand at Farnborough while Ali takes the Workshops on Saturday and Sunday so please drop by and say hello if you are going to the Make it Show!
Have a lovely Tuesday!
Jane
x

Sunday, 27 February 2011

Trying something new

When I was ill and on the sofa this week , I spent most of Tuesday watching the Craft Day on QVC. I loved seeing all the upcoming trends from the States and was captivated by Tim Holtz's demos. I have several distress ink pads and a few other Tim Holtz bits and pieces which I use in my projects but have never tried the 'proper' techniques he uses.
I treated myself to the Special Value kit they had on offer and it arrived Friday. Yesterday I had a go at blending alcohol inks and stamping on the backgrounds I created and made 5 cards quite quickly.
The red card is the second card I made and the butterfly card is the last one. I will show the others another day. It was so much fun trying something new and I will definitely get my inks out again and have another play. It was also refreshing looking through my stash and seeing how I could use the bits I already have in a different way.
I am entering both of these cards into the Ginger Snaps colour Challenge which is 'Jewel colours with gold'. My Friend Petra is on the Design Team and she is the master of distress and altered art, I am always in awe of the beautiful designs she creates!
Have a good Sunday.
Jane
x

Saturday, 14 August 2010

A vintage wedding card

I have a vintagey wedding card to share with you today. This was a another card I made for the gift shop order. I used K+Co papers and my favourite Elzybells Wedding stamp.

The lace was a find from a Charity shop and has a lovely vintage feel to it. I kept the layout quite simple, adding a couple of Prima flowers and a Tim Holtz adage ticket to complete the card.
Have a lovely Saturday!
Jane
x

Monday, 24 May 2010

A card for the CPS challenge

My Hubby and the boys went off to Wembley this evening to watch England vs Mexico so I had a lot of me time. I spent the evening with the dog and tidied some of my scraps and decided to make a quick card.


I noticed this CPS sketch the other day when I was blog hopping and thought it would work really well with this film strip I cut ages ago with Petra's Tim Holtz die.


I printed some Pollycraft Critters and Cogs images and coloured them in and cut them to fit inside the strip.
I cut some American Crafts paper to fit the card front and wrapped it with red cord. The sentiment if by Hero Arts. I mounted the film strip onto the card with foam pads and added a gorgeously perfect Fimo button made by my very talented blog friend Jane.
I added a small gem as a finishing touch. It was great fun taking part in the Challenge, I never seem to have the time normally...
Jane
x

Sunday, 20 December 2009

Welcome Isabelle!

This card is for one of my Good Friend's who had a baby just over a week ago. I used some backing paper donated to me by Petra and took my lead from this to create the card.


The stamped image is from Elzybells and is one of my favourites! This is actually one of the 1st Elzybells stamps I bought...the start of an addiction! The flower is by K+Co bought from Die cut dreams but I did swop some of the petals around with another one to fit with the colour scheme.
The little letters are from K+CO and I love using these. I thought the card had a bit of vintage feel to it so I aged the edges of the stamped image with Tim Holtz ink to go with the Kraft card I used in my layering.
A bit of organza ribbon and a few pearls and the card was ready to go!
Hope you are having a good weekend!
Jane
x

Tuesday, 6 October 2009

Fiakarettes Design Team project: An autumn Magnolia card

This is my 3rd Project as a Design Team member on the Fiskarettes website. As autumn is definitely in the air, I decided to make an autumnal card using my Leaves template for the shape cutting system.

To make the card:
1. Fold a piece of A4 card in half to make the card blank then cover with 2 coordinating My Mind's eye backing papers trimming to size with the Fiskars paper trimmer.
2. Cut a strip of orange backing paper and punch using the Fiskars scalloped paper punch and stick to bottom of card front. Weave a piece of narrow green ribbon through some lace and stick over scallop edged strip onto card.
3. Stamp image twice onto white card using the Fiskars stamp press and colour with Promarkers. Ink the edges of the image on the rectangle shape. Lay the Leaves shape template over the second coloured image and when happy with the positioning cut the image out. Ink the edges of the leaf shape with distress inks. Layer up both images using foam pads making sure the edges match up.

4. Stick the completed topper to the card with more foam pads.
5. Stamp the greeting onto a small rectangle, ink the edges and embellish with stick on gems.
6. Add a small green ribbon to the leaf stem and layer up a button tied with string onto a paper flower and add to top right hand of card.

This is the first time I used my Leaves shapecutting template and I loved how easy it was to cut such intricate shapes. I have lots more ideas on how to use the shapes for future projects. I can't believe I am already half way through my time on the Design Team already, I am really enjoying using the products, especially the Stamp press and paper trimmer, they make life so easy and allow you to be so precise when positioning stamps and trimming papers!
Jane
x